Visual Filters in Logos augment the text of a resource to focus your attention on specific features in a resource. By marking up the text, Visual Filters provide additional insight without requiring you to actively engage in study.
For example, you can set up Visual Filters to automatically show:
- Indicators for Atlas entries to a pericope
- Icons showing any custom notes you’ve created in a resource
- Highlights for specific verb conjugations or uses (like historical presents in the Book of Mark)
- Markers for grammatical constructions like the Granville Sharp Rule
Seeing the visual indicators can deepen your study with a glance or prompt additional study.
Using Default Filters
Logos includes several default filters you can use with any open resource. With any resource open, click the Visual Filters icon in the resource panel toolbar. Select any category or individual filter to show it in your opened resource.
Visual Filters will vary depending on the type of resource you are using. Bibles, for instance, include different default filters to monographs. Learn more about working with default Visual Filters in Logos.
Creating Custom Visual Filters
You can create custom filters to fit your exact needs. Filters are also constructed using search query syntax similar to the Search tool.
To create visual filter:
- Create a new Doc and choose Visual Filter.
- Choose a filter type:
- Basic: applied to any resource
- Bible: applied to Bible resources only
- Morph: applied to morphologically tagged resources only
- Build your filter.
Limit resources or passages, set formatting options, and more.
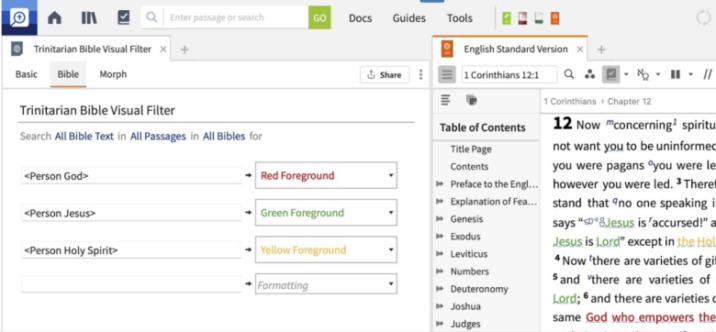
For instance, this custom Trinitarian Bible Visual Filter marks any references to the members of the Trinity in any Bible when applied.
Learn more about creating custom Visual Filters.
Download Community Visual Filters
Like any Logos Document, anyone can create and share a custom Visual Filter. This means you may not need to create any custom filters, as a public community one may fit your needs.
The Logos User Education team has created a variety of original language visual filters available to all Logos users. You can add any of these to your personal Logos Documents and customize them to your needs.
- Filter all Public Docs by Visual Filters.
Expand the Docs menu and select the Public tab to view all publicly-shared Logos Documents. Select the Visual Filter filter under Type. (If you don’t see the filter menu, click the menu icon to show the filter panel.) - Filter by author.
Click on User Ed under the Author category to filter all Filter Filters to show only those created by the User Education Team. - Add any filter(s) to your Logos Docs.
Select a filter and choose Add to your docs above the docs list or right-click on any visual filter and click Add to your docs.
To add multiple filters at the same time, select multiple filters (hold Shift and select a list of sequential filters or Cmd (macOS) or Ctrl (Windows) and click non-adjacent filters) and click Add to your docs above the menu or right-click on your selection and choose Add to your docs.